Getting Started with KaamDesk
A short guide for agencies new to KaamDesk
KaamDesk keeps your RTO work in one place — the vehicle jobs you have taken on, the files you have submitted to the RTO, who is carrying each file, and what the dealer owes you at the end. This guide walks through the everyday tasks in the order you will first meet them.
1. Getting started
Two words do most of the work in KaamDesk. Learn these and the rest follows.
Case
A case is one customer job for one vehicle — everything a dealer has asked you to do for that vehicle. The case holds the vehicle number, the customer, which case types were requested, and your charges.
Application
An application is one file you submit to the RTO — one physical file with its own application number, its own agent and its own progress. A case can have one application or several, each moving at its own pace.
So: the case is what the customer asked for, and the applications are the files you push through the RTO to deliver it.
The everyday loop
-
Create a case
Enter the vehicle and the work the dealer has asked for.
-
Open the case
Click the case row to reach Case Details.
-
Add an application
One per file you are taking to the RTO.
-
Move it through its stages
Submitted, then approved — or through an objection and a resubmission first.
-
Generate a bill
Once the case is approved, put it on a bill for the dealer.
2. Create your workspace
A workspace is your agency's own private space in KaamDesk. You create it yourself — there is nothing to apply for and nobody to wait on.
-
Go to the signup page
Open app.kaamdesk.com/signup.
-
Continue with Google
Tap Continue with Google and pick the account you want to run the workspace from. Google sign-in is the only way in — there is no password to set or remember.
-
Enter your business name
Under Set up your workspace, fill in Business name — for example, Sharma RTO Services. This name appears in the app header and on your printed bills, and you can change it later.
-
Enter your mobile number
A 10-digit Indian mobile number, so we can reach you if you need help.
-
Choose how to start
Sample data fills your workspace with example cases so you can click around and see how everything fits together. Empty workspace starts you with nothing, ready for your own cases.
-
Create Workspace
Tap Create Workspace. You land straight on the Dashboard and can start working.
Good to know: sample data is not permanent. When you are ready for real work, go to Settings → Sample Data and tap Remove sample data — it deletes only the examples KaamDesk added and never touches cases you created yourself.
3. Dashboard
The Dashboard is where you land after signing in. It is a read-only summary — nothing is changed from here, but almost everything on it is a link into the list it describes.
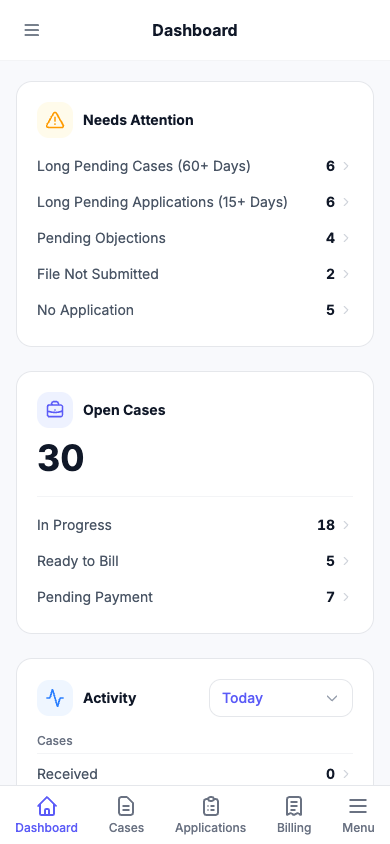
Needs Attention — start here
This is your to-do list. A row only appears when there is actually something to act on, so a short card is good news, and when everything is clear it simply says Nothing needs attention right now. Tap any row to open the matching list, already filtered.
- Long Pending Cases — cases still open well past the date you received them.
- Long Pending Applications — files submitted a while ago with no result yet.
- Pending Objections — files the RTO has objected to, waiting for you to fix and resubmit.
- File Not Submitted — applications you created but have not taken to the RTO yet.
- No Application — live cases with no application on them at all.
Open Cases
Your live workload at a glance, split three ways: In Progress (still being worked), Ready to Bill (approved and waiting to go on a bill) and Pending Payment (billed, money not in yet).
Activity
What actually happened in a period you choose — Today, Yesterday, Last 7 Days, This Month or Last Month — across cases, applications and billing. Useful for a quick end-of-day or end-of-month check.
Assigned Work
Who is holding live work right now: one row per external agent with active files, plus a row for your own organization for everything being handled in-house. Tap a row to see exactly which applications that person is carrying.
Where to go next: clear Needs Attention first, then check Ready to Bill — that is money sitting on the table.
4. Cases
Create a case
-
Open Cases and tap + New Case
This opens the Add New Case page.
-
Fill in the three required fields
Vehicle No, Case Type (pick every type of work the dealer has asked for — you can select more than one) and Source Channel (where the work came from).
-
Add the rest as you have it
RTO Name, Class, Case Received Date, your Case Charges and Additional Charges, and the owner's name and mobile.
-
Save Case
Entering a batch from one dealer? Use Save & Add Another — it keeps the source, RTO and case types so you only retype what changes.
Understand case status
A case has exactly three statuses, and you do not set them by hand:
- In Progress — the job is live. Every new case starts here.
- Approved — KaamDesk sets this automatically once every case type you asked for is covered by an approved application. This is also what makes a case billable.
- Cancelled — the one you set yourself, using Cancel Case, when the work is not going ahead.
Because approval is worked out from the applications, the way to move a case forward is always to move its applications forward.
Open a case and manage its applications
Click any row in the cases list to open Case Details. Applications are the first thing on the page — not a separate tab — with + Add Application in the section header.
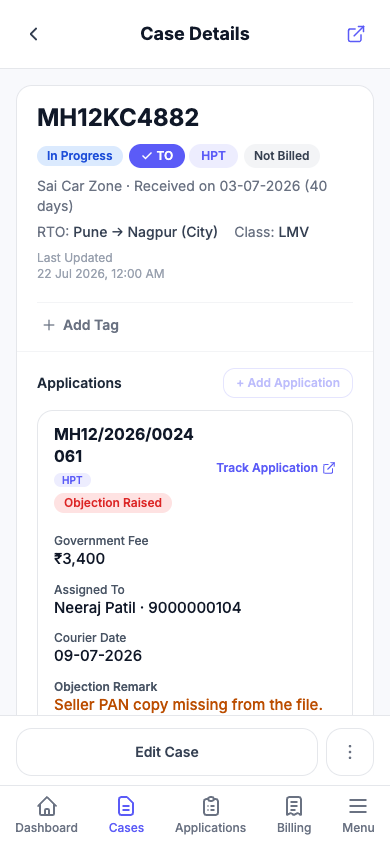
The cases list opens on In Progress so you see live work first. Switch to All to include approved and cancelled cases, and use the filters down the side for source, case type, status or payment status.
5. Applications
An application is one file at the RTO. It carries its own application number, its own assigned agent and its own progress — which is why a case with two separate submissions shows two applications rather than one muddled status.
Create an application
Applications are always added from inside a case. Open the case and tap + Add Application; the form opens right there in the list.
- Application Number — optional. Leave it blank if the RTO has not issued one yet and fill it in later.
- Covered Case Types — which of the case's requested types this file handles. Each case type belongs to exactly one application, so anything already covered disappears from the list.
- Government Fee (₹) — optional; what you paid the RTO for this file.
- Assigned To — optional; the external agent carrying the file. See Assignments.
- Receipt Date — defaults to today.
Tap Add Application to save. It starts at Application Created, and you advance it as the work actually happens.
Application stages
An application moves through these stages:
Application Created → Submitted → Approved
and, when the RTO raises an objection, through this detour before approval:
Objection Raised → Resubmitted
You move it with a button on the application card. Which button you see depends on where the file currently is:
- At Application Created — tap Mark Submitted when the file goes in to the RTO.
- At Submitted — tap Mark Approved when it clears. If the RTO objects instead, use Mark Objection Raised from the ⋯ menu.
- At Objection Raised — fix the file, then tap Mark Resubmitted.
- At Resubmitted — tap Mark Approved, or record another objection if the RTO comes back again.
Mark Submitted and Mark Approved are one tap and stamp today's date for you. Mark Objection Raised asks for Objection Remarks — a line on what the RTO wants — and Mark Resubmitted asks for the Resubmitted Date.
How resubmission works
An objection does not create a new application. The same file, with the same application number, moves from Objection Raised to Resubmitted and carries on. You do not add a second application, and nothing is lost.
The progress tracker on the card reflects this: the objection and resubmission steps only appear once a file has actually been objected to, so a clean application stays a clean straight line.
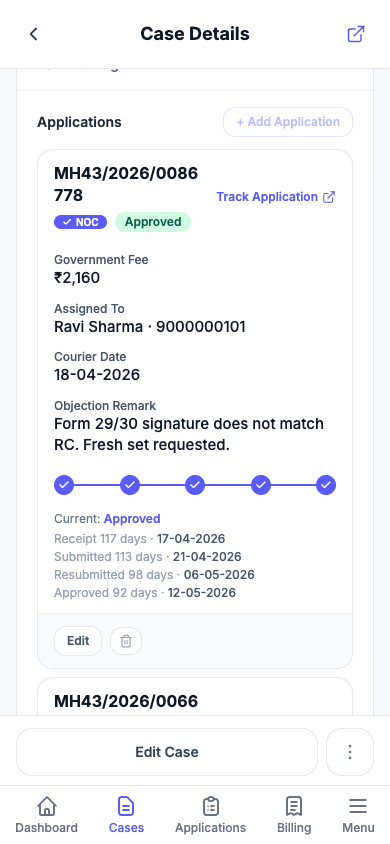
Cases and applications together
One case can hold several applications, and each case type is covered by exactly one of them. When every requested case type has been approved, the case itself becomes Approved — which is the signal that it is ready to bill.
The Applications page in the main menu is a queue across every case — useful for working by status or by agent rather than case by case. Clicking a row there opens the case it belongs to.
6. Assignments
Work is assigned per application, not per case — the agent who carries one file to the RTO is not always the one carrying the next.
Assign an application to an external agent
Open the case, add or edit an application, and pick someone in Assigned To. The list comes from your saved agents, so add them once under Settings → External Agents and they are available everywhere after that.
Once an agent is selected you can also record a Courier Date (To Agent) — the day the physical file left your office.
Leave Assigned To blank when your own team is handling the file. KaamDesk shows that work as Your organization.
See who is holding what
- The Assigned Work card on the Dashboard — one row per agent with live work, plus your own organization.
- The Applications page, filtered by Assigned To — the full list of files a particular agent is carrying and what stage each is at.
- The application card inside a case, which names the assigned agent alongside the rest of that file's details.
7. Billing
Where the amounts come from
Money is entered in two different places:
- On the case — Case Charges (what you charge for the work) and Additional Charges (extra services on top). Together these make the case's Total Amount.
- On each application — Government Fee, what you paid the RTO for that file.
Good to know: Government Fee is tracked for reference and is not included in the case's Total Amount. It still appears in its own column on the bill, so the dealer can see the fee and your charges separately.
Generate a bill
-
Open Billing and tap + New Bill
This opens the Generate Bill page.
-
Choose Bill To
Pick the dealer or channel you are billing. A bill covers one Bill To at a time.
-
Tick the cases
Select the cases to include, and check the running total in the panel.
-
Generate Bill
The bill is created and every case on it is marked as billed.
A case can only be billed once it is Approved and has not already been billed. Cases that cannot go on this bill still appear in the list with the reason shown — Already billed, Case cancelled, Different Bill To or Approval required. If it says Approval required, the fix is on the case: finish its applications.
After the bill is generated
Open a bill to see its Case Breakdown — every vehicle with its government fee, case charges and services, down to a Grand Total. From there you can:
- Print Preview, then Print / Save as PDF to send it to the dealer.
- Mark as Paid when the money arrives — and Mark as Unpaid if you need to undo it.
Each case tracks this too, moving from Not Billed to Bill Generated to Paid, which is what feeds the Dashboard's Ready to Bill and Pending Payment counts.

8. Settings & team
Settings is where you shape KaamDesk around how your agency already works. It is available to the workspace owner.
Set up your lists first
Under Case Setup you control the options that appear on the case form: Case Types, Class, Source Channels, Service Types and Case Tags. Ten minutes here — using your own names for the work you do and the dealers you do it for — makes every case afterwards faster to enter.
Source Channels is worth getting right early: it records where work came from and is also what you bill against as Bill To.
External agents
Add the runners who take your files to the RTO under Settings → External Agents, with their mobile number and, if useful, the RTO they cover. Saved agents are what appear in the Assigned To picker on an application. External agents do not sign in to KaamDesk — they are people you assign work to, not users.
Working with RTOs outside the built-in Maharashtra list? Add them under Custom RTOs.
Team members
Under Team Members, add a colleague by their Google email address and give them a role:
- Editor — can create and edit cases, applications and bills.
- Viewer — can see everything, change nothing.
No invitation email is sent. The person simply signs in at app.kaamdesk.com with that Google account and their access is live from that moment — so tell them yourself once you have added them.
Business profile
Business Profile holds your business name, owner name and mobile number. The business name is what shows in the app header and on printed bills, so it is worth setting exactly as you want customers to see it.
Sample data
Sample Data lets you add example cases to an empty workspace to explore with, and remove them again when you are done. Removing only deletes the examples KaamDesk added — your own cases are never touched.
9. Getting help
Stuck on something, or not sure how to fit KaamDesk to the way your agency works? Message us — WhatsApp is quickest, and we usually reply the same day.
Still Have Questions?
Tell us what you are trying to do and we will walk you through it. The quickest way to reach us is on WhatsApp — we usually reply the same day.
Ready to Set Up Your Agency?
Create your workspace, add your first case and see how it works with your own vehicles.
Start with sample data or your own cases.